Whenever you attach a new device to your Windows machine, Windows tries to install the device driver automatically, and whenever possible it even tries to update your device driver through the regular Windows update.
This is convenient most of the time as you don’t have to manually search the drivers for each and every device you attach to your Windows machine. However, it can also be frustrating at times when you specifically installed an older version of a device driver, and Windows automatically updated it disregarding your requirements.
So, if you ever need to, here is how you can disable driver updates through Windows update.
1. Disable Driver Updates Through Hardware Settings
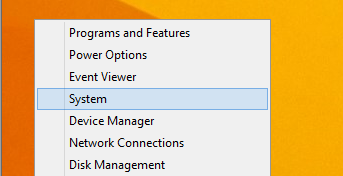
Disabling driver updates using the regular Windows hardware settings is one of the easiest ways. To start, press “Win + X” and select the option “System.” If you are on Windows 7, search for it in the Start menu.
This action will open the System window. Here, click on the link “Advanced System Settings.”
Once the System Properties window has been opened, navigate to the “Hardware” tab and click on the “Device Installation Settings” button.
In the Device Installation Settings window, select the “No, let me choose what to do” radio button and again select the “Never install driver software from Windows update” radio button. Click on the “Save changes” button to save the changes.
Restart your system and you are good to go.
2. Disable Driver Updates Through Group Policy
If you are managing multiple systems, then using Group Policy Editor is a good thing to do. To start, press “Win + R,” type gpedit.msc and press the Enter button to open the Group Policy Editor.
Navigate to the following folder: “Computer Configuration -> Administrative Templates -> System -> Internet Communication Management -> Internet Communication settings.”
Now, find the “Turn off Windows update device driver searching” option and double click on it.
The above action will open the additional settings window. Simply select the “Enabled” option and click on the “Ok” button to save the changes.
Restart your system and you are good to go. If you ever want to revert back, select either the “Disabled” or “Not configured” option.
3. Disable Driver Updates Through Registry Editor
The other way to disable driver updates is by using the Windows Registry Editor. First, press “Win + R,” type regedit and press the Enter button to open the Windows registry.
Once the Windows registry has been opened, navigate to the following key.
HKEY_LOCAL_MACHINESOFTWAREMicrosoftWindowsCurrentVersionDriverSearching
Here on the right pane you can see the “SearchOrderConfig” key. The default value data is set to “1,” which simply means that the automatic updates are enabled. To change the value, double click on it.
The above action will open the “Edit DWORD Value” window. Here, enter the new value data as “0” and click on the “Ok” button to save the changes.
The above action will completely disable the driver updates through Windows update.
As you can see, disabling the driver updates through Windows update is just a matter of a few clicks. But, only follow this tutorial if you know what you are doing, as disabling automatic driver updates may sometimes interfere with how the device works.
Do comment below sharing your thoughts and experiences about disabling driver updates through Windows update.
The post How to Disable Driver Updates Through Windows Update appeared first on Make Tech Easier.
